Install AVIX Server as Windows service
Preparations
Installation media
Download the installation media, the server zip archive. If you don´t have a download URL, ask your contact at Solme AB to get one. The downloadable unit is entitled "se.solme.avix.server.product-win32.win32.x86_64.zip" or similarly.
Unzip zip Archive
Unzip the server zip file at the host where you intend to install it.
Avoid white spaces in the path!
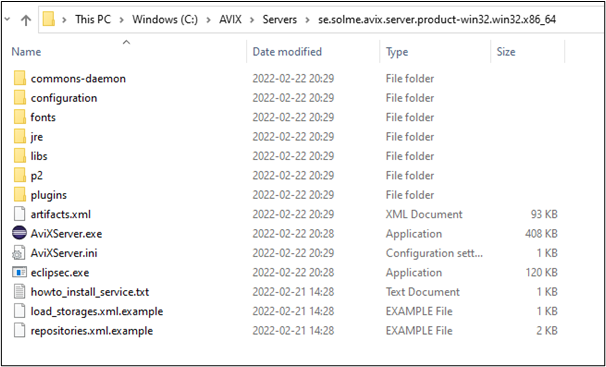
The unzipped content will look like this:
Carry-over
This is only relevant, if you have an existing server installation, i.e. if you are upgrading to a newer server version. The server has some settings and configuration files, which you will need to carry-over (copy) to the new installation.
- The database folder (in case internal h2 db has been used)
- configuration/se.solme.avix.prefs
- load_storages.xml
- repositories.xml
- host.id
- Also, check that the jvm parameters are to your liking
- They are reset when re-installing (as per contents in "register_service.bat" script)
- Set options for the service can be reviewed by running commons-daemon/SolmeAviXServer.exe service manager application.
- Should you change say the XMX, a restart of the service is needed.
Before the next step, installing the service, it is recommended to stop the "Solme AviX Server Service" in the Windows Services manager.
Install as Windows Service
- Open a command prompt with administrative privileges
- Press Windows key to open the Start menu. Start typing "cmd" to get Command Prompt application to appear
- Right-click and "Run as administrator"

- In the opened Command prompt, navigate to the unzipped AVIX server directory
- Tip: use the change directory command. Example: "cd .." to move one step up. "cd temp" to open a directory called temp.
- Tip: The command "dir" will display contents of current directory.
- Assert you are in the root directory of the AVIX server. Using the example screenshot from the "Unzip" section above, the "C:\AVIX\Servers\se.solme.avix.server.product-win32.win32.x86_64" directory.
- Install the service, by running a batch script file:
- Type: commons-daemon\register_service.bat (tip: start typing ”co..” and press TAB) Press "Enter" to run the installation script.
-


Verify service installation
Open Windows Services manager. Locate the "Solme AviX Server Service":
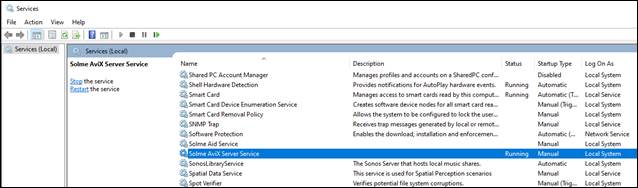
Verify that the service is running the AVIX5 server you just installed: Right-click and select "Properties":
Verify server installation
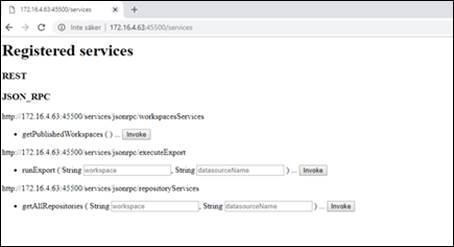
Check that ports are open (by default TCP 2036 and 45500)
If you test it on the same machine (as the server is installed on), try: http://localhost:45500/services
Additional configurations
If you need to do further configurations or are experiencing problems, below chapters are useful.
Ports and firewalls
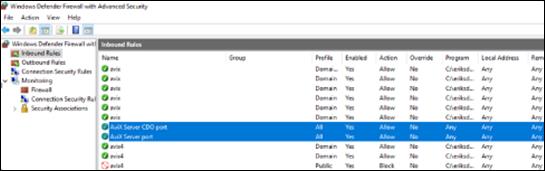
Verify ports are open (by default TCP 2036 and 45500).
Check that firewall is open on server host for the ports:
If you need to change the ports of the AVIX5 (Shop Floor Viewer) server, do the following:
- Stop the windows service
- Open the "se.solme.avix.prefs" file of the AVIX5 (Shop Floor Viewer) server
- Under the preference section for [se.solme.avix.server.cdo], you can specify the following port (to another value than default being 2036):
- server.tcp.ports=2050
- Under the preference section for [se.solme.avix.server], you can specify the following port (to another value than default being 45500):
- server.tcp.port=45510
- Start the windows service
Assign more memory
Currently, when the server is installed as a service, the memory allocated to the java server app is stated in the install script (commons-daemon\register_service.bat)
--LogPath=%CURRENT_DIR%\logs\^
++JvmOptions=-Xms256m^
++JvmOptions=-Xmx4096m^
++JvmOptions=-Dosgi.configuration.area=%CURRENT_DIR%\configuration\^
++JvmOptions=-Dosgi.install.area=%CURRENT_DIR%\commons-daemon\prunsrv.exe //ES/SolmeAvixServer
If ”out of memory” errors start happening on the server, the ”xmx” can be increased. Either by re-installation (with a higher value), or by stopping the server service, and then editing the registry value:
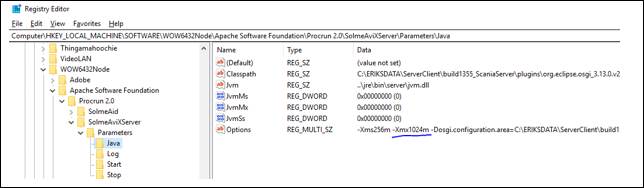
The easiest way to affect the correct registry value is by running the ”service manager” executable. It is found here: commons-daemon\SolmeAviXServer.exe. Run it, and look on the Java tab:
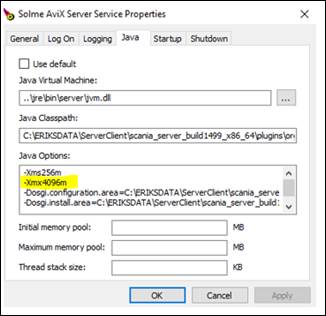
Try assigning more xmx. Example values (depending on how much physical memory the machine has): 16384m, 8192m, 4096m, 2048m.
After changing the registry value, restart the server service.
Other settings
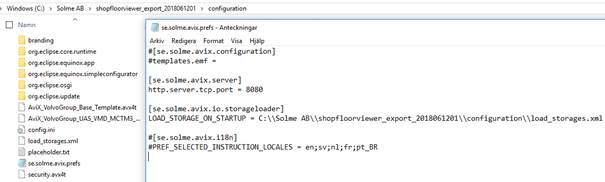
se.solme.avix.prefs
Remove the # to activate a setting.
Templates.emf is used to point out .avx4t files. However, we recommend not to use this setting since it will be changed in the future. To achieve the same result (to load custom .avx4t files) place the .avx4t-files in the folder configuration end remove the default .avx4t file if redundant.
#[se.solme.avix.configuration]#templates.emf =
Below controls which port to communicate on. Default port is 45500.
[se.solme.avix.server]
http.server.tcp.port = 45500
Below controls where Shopfloor Viewer should look for the file load_storages.xml. Load_storage.xml controls which folders and/or AviX-files that should be loaded on startup of the server.
As an alternative. users logged in as admin may upload any AviX-file manually.
#[se.solme.avix.io.storageloader]#LOAD_STORAGE_ON_STARTUP = C:\\Solme AB\\shopfloorviewer_export_2018061201\\configuration\\load_storages.xml
Below controls which languages should be available in the application
#[se.solme.avix.i18n]#PREF_SELECTED_INSTRUCTION_LOCALES = en;sv;nl;fr;pt_BR
Load_storages.xml (example)
<?xml version="1.0" ?><load_storage_config> <load_storage workspace="Workspace1" storage="C:\Solme AB\my_test\test of config2222.avx4"/> <load_storages workspacePrefix="ws2_" storageDirectory="C:\Solme AB\my_test_directory\" uploadtarget="true"/></load_storage_config>
The file load_storage.xml shall be encoded in UTF-8. Be aware if you use Notepad, it may result in a different encoding and the file won´t work. Notepad++ or similar text editors work well.