Appendix 3
LICENSE SERVER ON LINUX
INTRODUCTION
In this chapter we go over the basic installation procedure of an AVIX License Server on a Linux system. We use an Ubuntu Server 16.04 LTS, 32bit version (downloaded from http://www.ubuntu.com/download/server) for this guide, but the same procedure can be used with some tweaks to get it to run on another Linux distribution using other virtualization environments.
We do the full installation of a new virtual machine for the server from scratch on a virtual host – in this instruction we use Hyper-V - and install the License Server there.
Please note that the software AVIX License Server Manager that is used for final configuration of the license server and for license data synchronization requires Windows and therefore a second machine that runs Windows is needed to complete the installation.
PREREQUISITES
Before you begin you should have some information and installation files at hand
- Media for clean install of a Linux host OS
- Linux version of the installation package for an AVIX License Server (available from Solme)
- Installer for AVIX License Server Manager (available from Solme)
- A license server id (available from Solme)
For this guide you should also possess basic knowledge of Linux and networks. This guide does not describe basic operations like how to change directory, rename files, and such.
INSTALLATION
The steps
- Install AVIX License Server manager on a windows machine
(see chapter Installing License Server Manager) - Create new virtual machine
- Installation of Ubuntu Server 32-bit
- Install Java SDK
- Install AVIX License Server
Create new virtual machine
The requirements on the virtual machine is pretty low. We will use the ones listed below.
| Property | Value |
|---|---|
| Memory | 512 MB |
| CPU cores | 1 |
| HDD | 10 GB |
| Network | Yes, external access to internet |
| Initial boot medium | ubuntu-16.04-server-i386.iso |
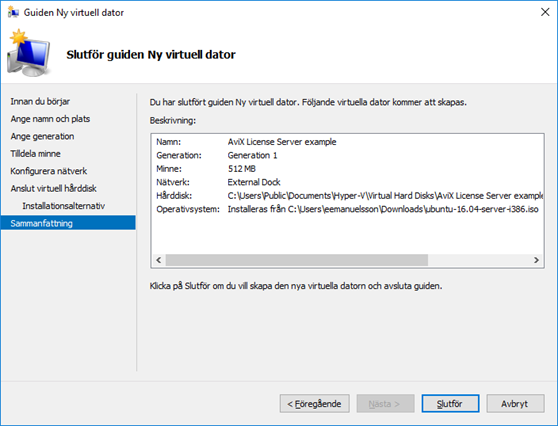
Figure 4. The final specs of the new virtual server in Hyper-V
INSTALLATION OF UBUNTU SERVER
When the new virtual machine is started the installation oft he OS begins.
You can safely specify your keyboard layout and time zone as you wish, but to avoid localization problems use english locale for other localization settings.
Chose a name for your default user and be sure to emember the password you set for this user.
Make a single partition on your virtual harddrive.
INSTALL JAVA SDK
The Oracle Java SDK that we want is not available from the default package repositories, but it is however available from a third party repository.
See:
www.ubuntuupdates.org/.
Add the third party repository "webupd8team/java" by running the commands below.> sudo apt-get install python-software-properties
> sudo add-apt-repository ppa:webupd8team/java
> sudo apt-get update
Install Oracle Java 7 SDK.> sudo apt-get install oracle-java7-installer
When the installation is complete do a quick verification to ensure that the installation was successful.> java -version
This command should result in something similar to the output below.java version "1.7.0_80"<
Java(TM) SE Runtime Environment (build 1.7.0_80-b18)
Java HotSpot(TM) Client VM (build 24.80-b11, mixed mode)
INSTALL AVIX LICENSE SERVER
Get a copy of the installation of AVIX License Server for Linux to your home folder.
In our case we have a AVIXLicenseServer_v3.5.3-for-Linux.zip in our home folder that we have downloaded from the server download area on http://customers.solme.se.
Install unzip command.> sudo apt install unzip
Unzip installation package.> unzip AVIXLicenseServer_v3.5.3-for-Linux.zip
This creates a folder "LicenseServer_Linux" in the current directory – "~/LicenseServer_Linux".
Create installation directory – "/opt/AVIXLicenseServer".> sudo mkdir /opt/AVIXLicenseServer
Navigate to the installation directory and install the AVIX License Server there.> cd /opt/AVIXLicenseServer
> sudo tar -zxf ~/LicenseServer_Linux/LicenseServer.tar.gz
This should create a folder "LicenseServer" in the folder /opt/AVIXLicenseServer
Rename the folder to include the AVIX License Server version to make it easier to remember what is installed.> sudo mv LicenseServer LicenseServer_v3_5_3
Test the installation by starting it manually with the command.> sudo java -Duser.language=en -jar /opt/AVIXLicenseServer/LicenseServer_v3_5_3/bin/run.jar
Connect to the server from an external AVIX License Manager (user name: admin pw: default). Have your license server id ready as well.
Try to perform an internet synchronization via the menu "Server/Synchronize Server" in the AVIX License Manager.
CONFIGURE AVIX LICENSE SERVER
Automatic start on Boot
Create start script "startLicenseServer.sh" in /opt/AVIXLicenseServer
> sudo vim /opt/AVIXLicenseServer/startLicenseServer.sh
Script content (in one line)
java -Duser.language=en -jar /opt/AVIXLicenseServer/LicenseServer_v3_5_3/bin/run.jar > /opt/ AVIXLicenseServer/startup.log
Add execute rights to the script file
> sudo chmod +x /opt/AVIXLicenseServer/startLicenseServer.sh
Configure script to be run on boot by editing the file /etc/rc.local
> sudo vim /etc/rc.local
Add the entry below somewhere above the line “exit 0”in the rc.local file
/opt/AVIXLicenseServer/startLicenseServer.sh &
Static IP on the server
Edit the file /etc/network/interfaces and add static IP information there.
Example. default contents of "/etc/network/interfaces" that uses dhcp# This file describes the network interfaces available on your system
# and how to activate them. For more information, see interfaces(5).
source /etc/network/interfaces.d/*
# The loopback network interface
auto lo
iface lo inet loopback
# The primary network interface
auto eth0
iface eth0 inet dhcp
Example. Static ip configuration in "/etc/network/interfaces". Be sure to use values that fit your network. All changes made in this example is in bold below.# This file describes the network interfaces available on your system
# and how to activate them. For more information, see interfaces(5).
source /etc/network/interfaces.d/*
# The loopback network interface
auto lo
iface lo inet loopback
# The primary network interface
auto eth0
#iface eth0 inet dhcp
iface eth0 inet static
address 172.16.5.2
netmask 255.255.0.0
gateway 172.16.1.1
broadcast 172.16.255.255
dns-nameservers 172.16.3.1
FINAL VERIFICATION OF INSTALLATION
Restart the license server computer and then connect to it from an AVIX License Manager.
If it works, it verifies that:
- The AVIX License Server starts on boot
- The AVIX License Server gets the correct IP
- The AVIX License Server is accessible from external sources