Using AVIX SMED step-by-step
The step by step instruction below will guide you through the creation of a SMED-analysis. It is assumed that you have already filmed the actual machine resetting.
1. Creating the factory layout
When performing the steps described below, it is recommended that you also enter values for the “Name” and “Number” attributes (where applicable) in the corresponding fields. Editors are automatically opened for each object when it is created.
-
Create a Factory

-
Create a Building
 (if needed. If the line should appear under the building, press shift when creating the line)
 -
Create a Line
 (think of the line as the definition of the resetting i.e. Machine 1 product A Product B.
 -
Create a Workstation
 (think of the work station as the area, machine group, machine to be analysed)
 -
Create a Resource
 (in case more than one operator is/will be present)


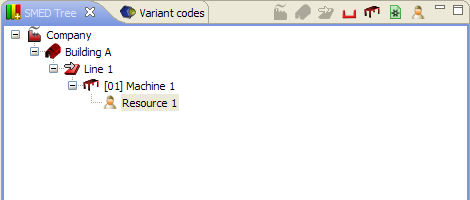
If the actual resetting is involving more than one machine/workstation or more than one resource, create corresponding structure in the SMED-tree.
2. ividing the filmvideo of the resetting into a sequence of resetting tasks
OOnce a Resource exists, you can start identifying the resetting tasks that are performed by the resetting personnel. The work units (Process Tasks) are easily captured using film documentation of a workstation.![]() nce
nce
-
Start by creating a task (The Process Task editor will open)
-
In the Process Task editor, click on
 and select a film.
 -
Play the movie to find the starting point of the task, stop the movie.
-
Register that position as a starting point by clicking on
 (green) in the open Process Task editor.
 -
Play the movie to find the ending point of the task, stop the movie.
-
Register that position as a ending point by clicking on
 (red) in the open Process Task editor.
 -
Create new tasks until the entire resetting is divided into tasks.

Screenshot of the Process Task editor. The green and red arrows are used to register starting and ending point for a task.
If the line is selected the SMED-graph should now resemble the picture below, of course the scale and number of tasks will differ.

The blocks in the SMED graph are representing the resetting tasks. In this case the entire resetting takes 11.67 minutes.
One of the principles in SMED is to separate internal tasks from external tasks and rearrange the sequence to minimize the inner resetting work. Easily explained the inner, or internal, resetting is when the machine is stopped in order to prepare it to produce another product.
View the movie of each task and decide whether it is an inner or outer task. If the task can be performed when the machine is running it is an outer task, otherwise the task should be classified as an inner task. The SMED-type (inner or outer) is set by right clicking on a task in the graph and the SMED type is set in the submenu that appears. The task will change colour when you set the SMED-type. Inner tasks are light-brown and outer tasks are green. If the line is selected the SMED-graph should resemble the picture below.

Screenshot of the SMED-graph with the SMED-type set for each task. With this sequence the preparation takes 1.5 min, the internal resetting 8.17 minutes and the reordering after the resetting 2 minutes. The information can viewed in numerical form in the SMED result window.
W hen the tasks are classified as either inner or outer tasks the sequence should be changed to minimize the internal resetting time. By drag and drop in the graph the sequence is changed and the numbers in the graph will be updated as a consequence. In this case, by classifying and reordering the sequence of the task the internal resetting time has been shortened from 11.67 minutes to 6.17 minutes, or 47 %.
Screenshot of the resetting after rearranging of the sequence.
In many cases it is possible to shorten the internal resetting further by doing tasks in parallel, this is another important principle in SMED. When working with parallel tasks it is very useful to use rules between tasks in AviX. The available rules are:
-
Start after…
-
End before…
-
Start at same time…
-
End at same time…
With use of rules or restrictions between tasks the graph will adjust to fulfil the rules if possible.
The task clean guiding surfaces in the graph above could typically be done by someone else while the new tool is assembled. However, it has to be done after the completion of the task Disassemble old tool 1. To achieve this following is done in AviX:
-
Create a second resource
-
Move the task Clean guiding surfaces to the second operator
-
Right click on the task Disassemble old tool 1 and select End before and click on task Clean guiding surfaces
By adopting parallel tasks the internal resetting time is shortened by another 1.5 minutes. On the other hand two persons are required during a part of the resetting.
Screenshot of the SMED graph with a second person supporting operator 1 during a part of the resetting.
If a number of machines are connected, it is likely that each machine can´t be reset independently. Every unit of the first product type has to be processed in all machines before all machines can be reset. However, the resetting of the first machine can start as soon as the last unit of first product type is processed in the first machine. If there is a buffer between the machines a buffer ![]() should be created in AviX. The buffer can contain regular process tasks to resemble reality as much as possible. The picture below shows two connected machines with a buffer in between. The buffer in the picture takes 5 minutes to process in machine 2 and subsequently the resetting start for the second machine is delayed 5 minutes.
should be created in AviX. The buffer can contain regular process tasks to resemble reality as much as possible. The picture below shows two connected machines with a buffer in between. The buffer in the picture takes 5 minutes to process in machine 2 and subsequently the resetting start for the second machine is delayed 5 minutes.

Figure 1 Screenshot of the SMED graph of two connected machines with a 5 minute buffer in between. To right is the SMED result with the line selected. The delay caused by the buffer appears in the SMED graph as well as in the SMED result.