
CONFIGURATION: MS SQL SERVER 2
This document guides IT administrators through setting up a dedicated SQL Server database instance for use as a database repository for the AVIX Server. The object models are stored using EMF CDO, which means that the user account accessing the DB server and the DB will need a certain set of permissions.
Overview & Prerequisites
Before configuring AVIX Server, the database engine must be installed and populated with the target database. This table demonstrates configuration properties and values from the XML configuration file /repositories.xml at the root of the AVIX Server installation:
| Parameter | Configuration Property | Example Value |
| Host Address | serverHost |
|
| Port | portNumber |
|
| Database Name | databaseName |
|
| Database User | databaseUser |
|
| Password | databasePassword |
|
| SSL Connection | useSSL |
|
If you follow the guide below, to install the SQL Server engine and create both a dedicated database as well as a user account, you will be able to fill in the repositories.xml of your AVIX Server accordingly and launch the server to connect.
1. Engine Installation
This guide demonstrates installing and configuring SQL Server 2022 (and 2025) Express Edition.
Windows
Download the SQL Server Express edition of your choice.
| Edition | Download Link |
| SQL Server 2025 Express |
https://download.microsoft.com/download/7ab8f535-7eb8-4b16-82eb-eca0fa2d38f3/SQL2025-SSEI-Expr.exe |
| SQL Server 2025 Express Core |
https://download.microsoft.com/download/dea8c210-c44a-4a9d-9d80-0c81578860c5/ENU/SQLEXPR_x64_ENU.exe |
| SQL Server 2022 Express | |
| SQL Server 2022 Express Core |
(Express Core is the SQL Server Engine only)
Winget install Microsoft SQL Server 2025 Express (v17), or 2022 Express (v16):
winget install Microsoft.SQLServer.2025.Expresswinget install Microsoft.SQLServer.2022.ExpressCaution before installing sql server on windows 11/ SERVER 2022
If installing on a Windows 11/Server 2022, there may be problems due to system disk sector size greater than the supported 4KB. Please read more about it on the Microsoft knowledgebase article.
To know if your Windows is affected, the easiest way is to run a Command prompt as Administrator, and run:
fsutil fsinfo sectorinfo <DriveLetter>:
for example:
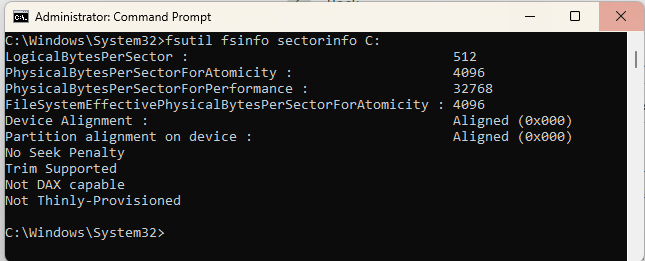
Quoting the Microsoft KB article:
"Look for the values PhysicalBytesPerSectorForAtomicity and PhysicalBytesPerSectorForPerformance, returned in bytes. If they're different, retain the largest one to ascertain the disk sector size. A value of 4096 indicates a sector storage size of 4 KB."
If the values reported for both of these values are 4096, you should be fine to go on and install SQL Server.
If not (as in the example above): Windows is reporting a higher value than 4 KB, which SQL Server cannot handle. You are recommended to handle this before installing SQL Server.
As the KB article indicates, there are mainly two remedies to the situation:
- Make sure to set the value of the registry key
ForcedPhysicalSectorSizeInBytesto* 4095. This forces the sector size to be emulated as 4 KB. - Plan to have the SQL Server's DB files off the internal NVMe drive: format a virtual hard disk - create a fix-sized virtual disk in Windows Disk Management, format it explicitly with 4096-byte sector size, and mount as a local drive letter (e.g. D: ).
2. Network configuration - TCP/IP and port
The SQL Server Configuration Manager will be used for this.
SQL Server Configuration Manager - SQL Server | Microsoft Learn
Locate the manager application:
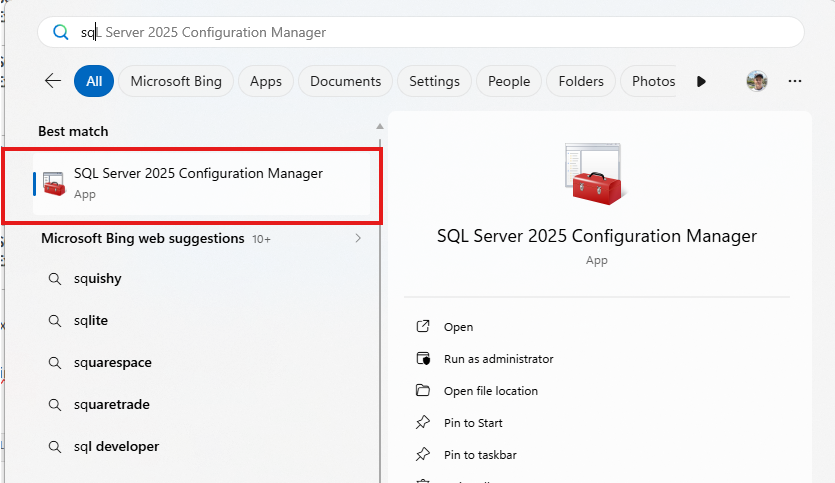
or:
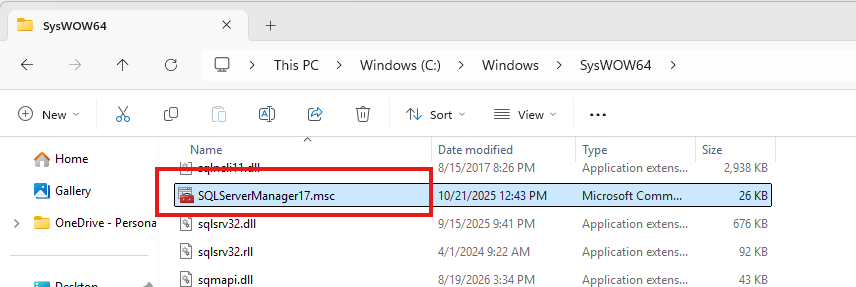
Step-by-step configuration
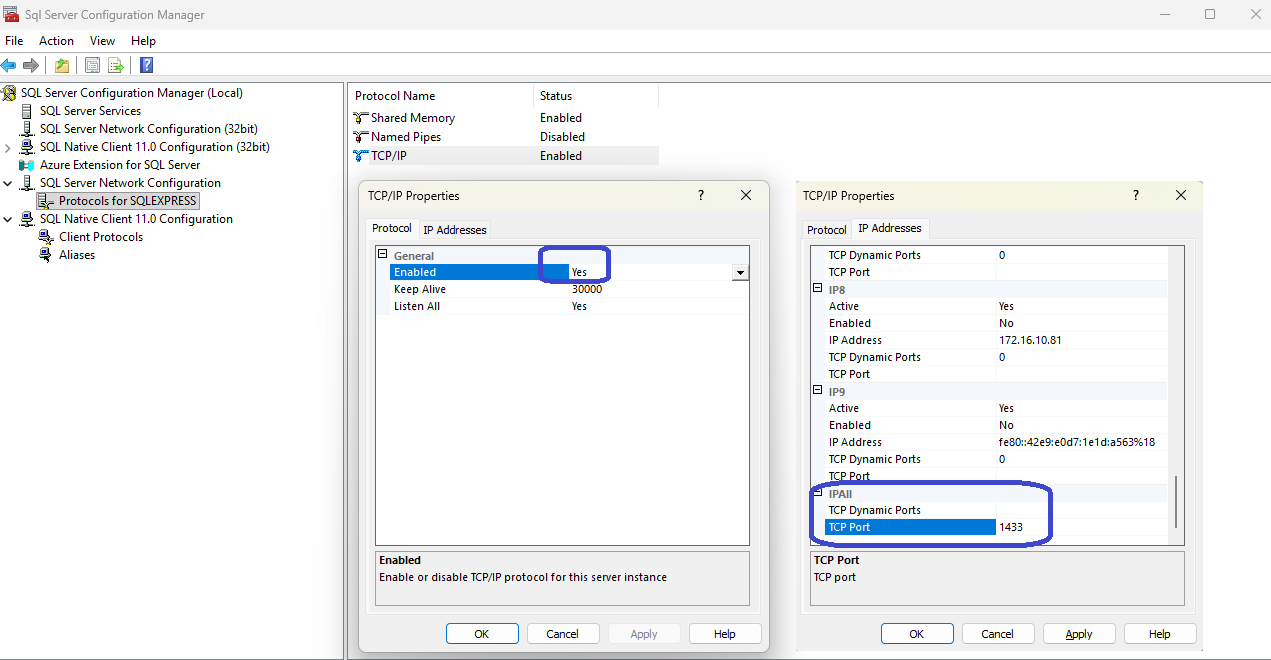
- Open SQL Server Configuration Manager
- Expand SQL Server Network Configuration → Protocols for [Instance Name]
- Double-click TCP/IP (ensure it is set to Enabled).
- Select the IP Addresses tab.
- Scroll down to the IPAll section at the bottom.
Static port is recommended, since it ensures that applications (AVIX Server) always connect to the same endpoint, making firewall rules simple:
-
TCP Dynamic Ports: Clear this field completely (leave it blank).
-
TCP Port: Enter your desired port number (default is
1433).
Crucial post-configuration steps
-
Restart the SQL Server Service: Changes made in SQL Server Configuration Manager do not take effect until you restart the
SQL Server (INSTANCE NAME)service. -
Configure Windows Firewall: Create an Inbound Rule on the server hosting SQL Server to allow inbound traffic on your specified TCP port (e.g.,
1433).
3. Configure SQL Server for usage with AVIX
This guide walks through configuring the SQL Server instance for use as a relational store for AVIX Server (via EMF CDO).
The SQL Server Management Studio is the tool used to configure, manage and administer the components of a SQL Server instance. It can also be used to access the existing DB and run SQL statements.
https://learn.microsoft.com/en-us/ssms/install/install
1. Prerequisites & Initial Connection
-
Launch SQL Server Management Studio (SSMS).
-
In the Connect to Server dialog:
-
Server type: Database Engine
-
Server name:
localhost(orlocalhost\SQLEXPRESSif using Express) -
Authentication: Windows Authentication
-
-
Click Connect.
2. Enable SQL Server Authentication (Mixed Mode)
By default, SQL Server allows only Windows Authentication (sometimes also referred to as "Integrated Authentication"). AVIX Server typically connects using a dedicated database user via JDBC, requiring Mixed Mode Authentication.
In Object Explorer, right-click the root server instance and select Properties.
Select the Security page in the left pane. Under Server authentication, select SQL Server and Windows Authentication mode. Click OK.
Right-click the root server instance in Object Explorer and select Restart (or restart the service via services.msc).
3. Create a Dedicated Application Database
Create a clean database dedicated to storing AVIX domain data managed by EMF CDO.
Method A: SSMS GUI
-
Right-click Databases , select New Database...
-
Enter Database name:
avix_db(or preferred name). - Adjust file sizes (see suggested settings in image below)
-
Click OK
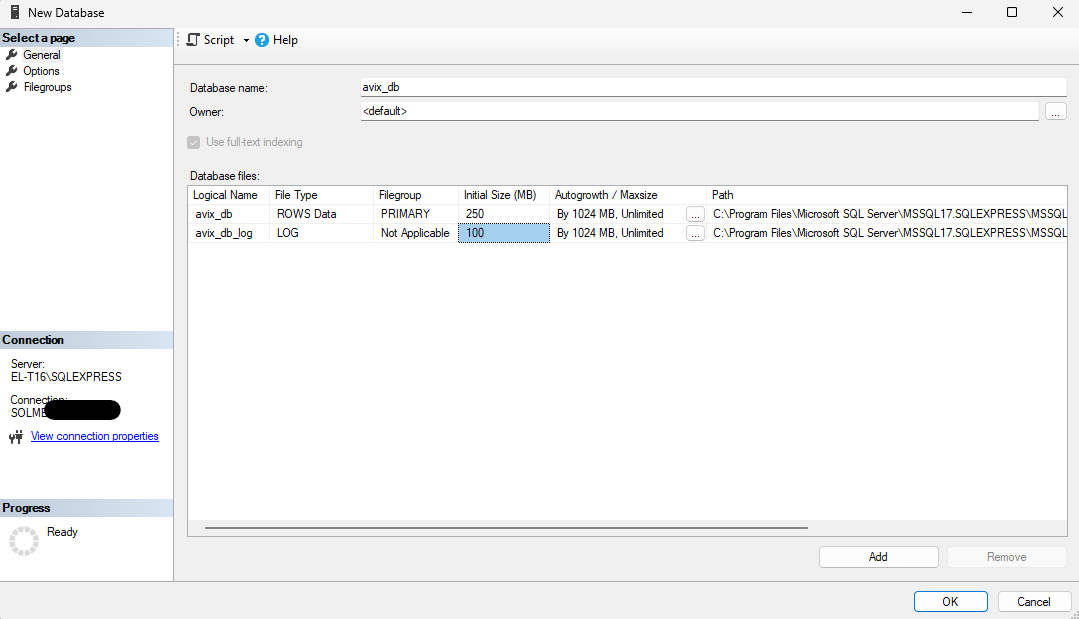
Method B: T-SQL Script
-- Create database for AVIX Server
CREATE DATABASE [avix_db]
ON PRIMARY
(
    NAME = N'avix_db_data',
    FILENAME = N'C:\Program Files\Microsoft SQL Server\MSSQL16.MSSQLSERVER\MSSQL\DATA\avix_db.mdf',
    SIZE = 250MB,
    FILEGROWTH = 1024MB
)
LOG ON
(
    NAME = N'avix_db_log',
    FILENAME = N'C:\Program Files\Microsoft SQL Server\MSSQL16.MSSQLSERVER\MSSQL\DATA\avix_db_log.ldf',
    SIZE = 100MB,
    FILEGROWTH = 1024MB
);
GO
4. Create the Dedicated Application User & Assign Permissions
Create a login for the application, and map it with appropriate permissions to avix_db.
Recommended Roles for EMF CDO access
CDO dynamically creates and modifies tables and indexes when schemas evolve, while performing standard CRUD operations during application execution. These are the recommended roles, if following the principle of least privilege :
-
db_datareader: Read access to all tables. -
db_datawriter: Write access to all tables. -
db_ddladmin: Allows CDO schema updates (table/index creation and modifications).
This ensures the account can create, drop, and manage tables within its designated database but cannot access or modify other databases on the same instance. Avoid db_owner however, to prevent accidental db deletion or security changes.
Method A: SSMS GUI
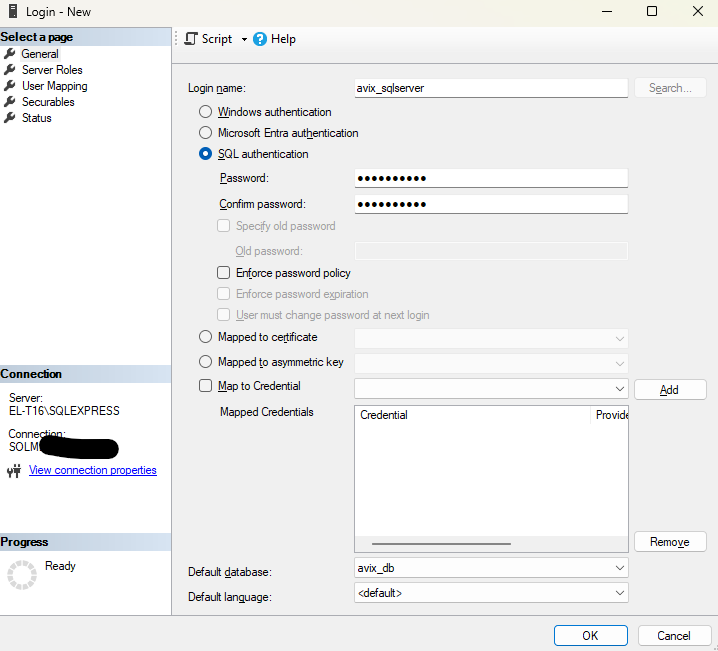
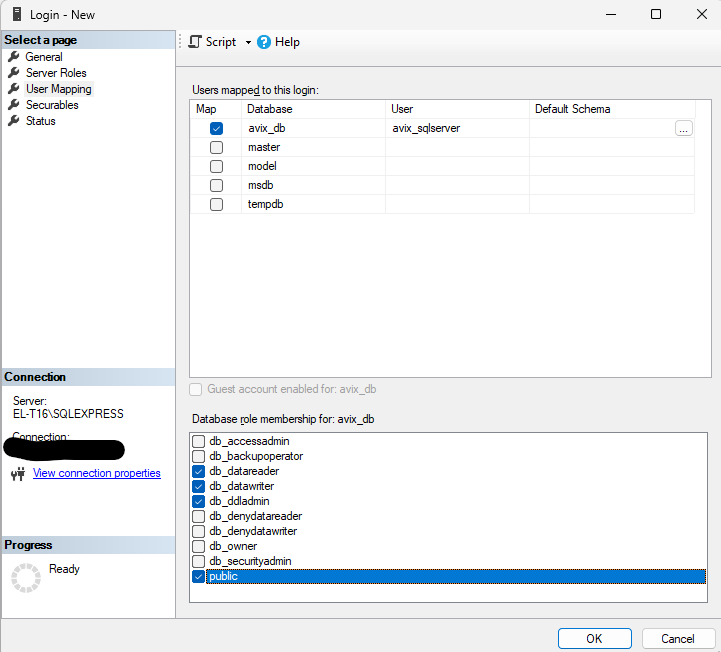
Click OK to create the login, database user, and role assignments simultaneously.
Method B: T-SQL Script
SQL
USE [master];
GO

-- 1. Create Login at the Server Level
IF NOT EXISTS (SELECT * FROM sys.server_principals WHERE name = N'avix_sqlserver')
BEGIN
    CREATE LOGIN [avix_sqlserver]
    WITH PASSWORD = N'ChangeThisStrongPassword123!',
         CHECK_EXPIRATION = OFF,
         CHECK_POLICY = ON;
END
GO

-- 2. Switch to the Application Database
USE [avix_db];
GO

-- 3. Create User in the Database for the Login
IF NOT EXISTS (SELECT * FROM sys.database_principals WHERE name = N'avix_sqlserver')
BEGIN
    CREATE USER [avix_user] FOR LOGIN [avix_user];
END
GO

-- 4. Grant Required Roles for CDO Schema & Data Management
ALTER ROLE [db_datareader] ADD MEMBER [avix_sqlserver];
ALTER ROLE [db_datawriter] ADD MEMBER [avix_sqlserver];
ALTER ROLE [db_ddladmin]   ADD MEMBER [avix_sqlserver];
GO
5. Verification & Connection Test
-
In SSMS, click File and Connect Object Explorer...
-
Select SQL Server Authentication.
-
Enter username (
avix_sqlserver) and password (ChangeThisStrongPassword123!). -
Ensure you can connect and browse
avix_db.
Misc information
Need to detect SQL Server version you are having:
- Right-click on the root server instance in SSMS, and show properties. Look for the "version" number (e.g. 15.0.XXX). This is the RTM or build version.
- Check the SQL Server versions on: https://www.sqlserverversions.com/ and see which version matches your RTM.